| |
Dutch Flat Earth Lodge
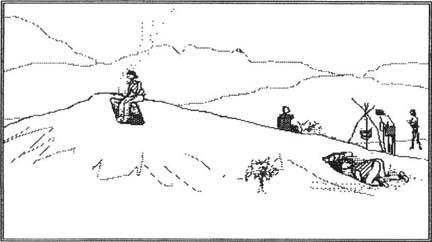
Project Community hosted three trips: a summer building a really good Sioux tipi,
and living in it at Whale Gulch, California- a remote costal stretch. Then we took
the tipi to the Yolla Bollies- a remote forest area and built a trail. Finally, we
took off to Dutch Flat, California and built an earth lodge with a team of Berkeley
high school students and two leaders.
|
|
|
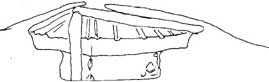
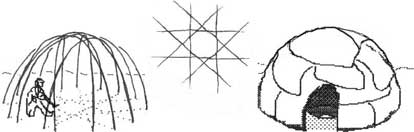
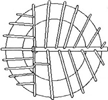
| Underground dwelling modelled after the California Earth Lodge |
|
|

|
|
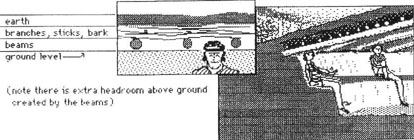
building materials (free if available) |
|
|
|
smoke hole and vent entrances |
|
|
|
interior: 20 foot diameter |
|
|
|
can sleep 12 adults |
|
|
|
good in weather |
|
|
|
4 or 5 inches of earth on top |
|
|
|
alright to walk on top |
|
|
|
grass grows eventually |
|
|
TIMING OF TRIP
After the Tipi Trip (summer, 1969) there was a desire to do another dwelling-centered
community event. When we found that we had the use of land in the Sierras- owned
by the parents of a Project member- we planned a trip to build a 20 foot permanent
California earth lodge. The project was completed during part of the ten day Easter
vacation, April, 1971.
PRESENTATION MATERIALS
Aside from these notes there is a model, several black and white photos, an 8 1/2
minute
Super 8mm home movie, color stills and composites from the movie, and copies of source
materials. Contact Don Cochrane <earthlodgedc@hotmail.com>. With band width
getting wider, a digitized version of the movie (mentioned above) may be added to
this site in the future as well, for it shines a different light on the process.
STARTING OUT
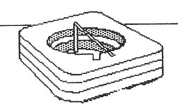
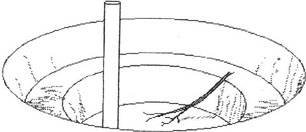
Start with a small model. (See footnote #1- model construction.)
 |
|
 |
| |
|
|
| Earth lodge model showing double pit, center post, and ridge pole. |
|
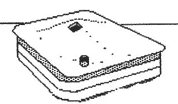
Model with earth cover made of wet-glued paper towel, showing smoke
hole and vent. |
Another approach is to make a larger model on the beach, keeping track of the sand
removed from the hole. This way you will gain a feeling for how much dirt will be
needed from the hole to cover the roof beams. (See MISTAKE notes about digging too
shallow a hole at Dutch Flat.)
Once the model is done and you are ready to tackle the full scale project, sit the
group on the ground to establish a comfortable size for the lodge in terms of sitting,
work space and sleeping. (The 20 foot diameter of the Dutch Flat lodge- measured
across the top of the ledge backrest- was large enough to sleep 12 people.)
| Digging and Building for The Earth Lodge |
|
 |
|
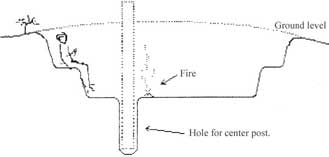
| How To Dig Double Pit: Autor's Admission: This is not the hole
we dug at Dutch Flat, but the one we shold have dug. See the Mistake, below, in this
section. |
|
 |
|
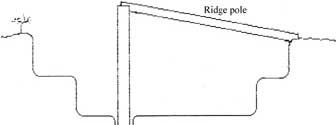
| Angle Of Ridge Pole: The ridge pole should not be set at too
steep and angle. This is about right. |
|
 |
|
| Layering Of Roof Materials: Over the beams go branches, then
sticks, then twigs, then bark laid like shingles to block out the 4 or 5 inches of
earth cover. |
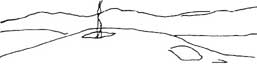
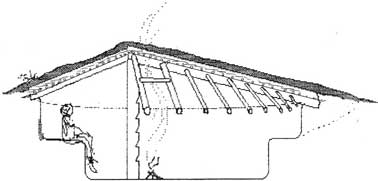
THE PLACE (a rise without water or rock)
Be sure terrain has good drainage; best to work on a dome-shaped area; a rise in
the land, the crest of a hill. (See footnote 2.) Avoid any land that may collect
water after a rain or in the winter; best to spend alot of time checking out questionable
land. Dig a hole where you plan to put the center post. If there is no rock there
may still be underground water. (See footnote 3.)
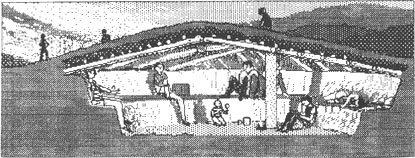
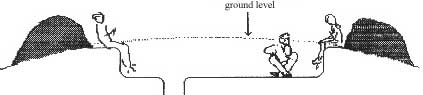
THE DOUBLE PIT
We wanted a double level with a ledge for sitting and sleeping. This was so appealing
that the round pit with the ledge became our "place" even as the digging
progressed. The pit was dug to a depth that would give headroom for sitting at the
backrest and headroom for standing in the central area.
HEADROOM
Do not use the length of the center post to figure headroom. There is headroom above
the top of the center post and above the ridge pole as well. Because of this, headroom
is figured- at least in tighter situations- from floor level to the top surface of
the ridge pole. Headroom for sitting around the periphery is measured to the top
surface of the radial beams. That is, in a smaller lodge you may bump your head on
the ridge pole but not on the radial beams which rest upon it. Note the tall person
in the illustration who is leaning against the backrest. He has to position himself
between the beams but he does get some clearance.
SAVING THE TREES
Dutch Flat is up in the famous "Motherload" area of the Sierras. The land
was placer mined, using an aggressive water sluicing technique. With the topsoil
washed away, it looks like a moonscape except for a little Mansanita brush and a
few evergreens. It was clear that the barren land would take decades (at least) to
repair itself. When we saw this we decided to use only dead trees for our wood. After
a long search we were fortunate to find freshly dead wood for the center post and
ridge pole from a tree that was apparantly drowned in a temporary rain pond. The
wood for beams was also still strong. This meant alot more work for us- there's a
note from the trip that says, "...a little despair about rafters..."- but
the effort paid off. The integrity of the group depended on the assurance that we
were not adding to the devastation.
NO NAILS
We found no need for modern building materials or methods. The structure, composed
of parts merely place upon each other was so solid that the whole group could dance
on the roof without fear. The most technological thing we did was to cut notches.
Even that was usually avoided in order not to weaken the beams. (We did use a polyethylene
tarp to cover the lodge one night when it rained before the roof was closed over,
this to keep the earth dry in the pit.)
NO LEAKS
The first night that we slept inside during a rain I was worried about the strength
of the rafters under the new load of all that water and also about water getting
in. But there was no sign of a problem in either case. Why there are no leaks remains
a puzzle. Certainly the bark "shingles" are not accurately overlapped to
prevent drips. I suspect that it's easier for the water to run off through the earth
cover by capillary action than it is for it to drip down. The movie shows us putting
leaves down over the bark shingles, probably as an insurance measure. We are following
in old footsteps here. In studying the Sioux tipi I learned of sophisticated problem
solving in the design. For example, the women who conceived the details of the plains
tipi did not try to keep the rain out, as we would; they let it in under terms they
found acceptable. (See footnote # 4.)
SMOKE
The vent of the lodge is oriented toward the east to put it generally downwind, as
in the door of a tipi. Smoke was seldom or never a problem for us, probably because
of the small size of the fire, about six inches wide. (In case the word, "vent",
is confusing, the smoke does go up the smoke hole, not out the vent.) As mentioned
in the author's preface of Indian Tales, it does not bother you to descend through
the smoke when entering the lodge, also because of the small fire.
DIRT
"Ishi in Two Worlds" (p. 32) describes a lodge much like ours in dimension
and detail, including the ledge around the circular pit. The interior was lined with
tule mats. We didn't do this for fear of fire. The ledge had foam sleeping mats on
it. The dirt floor and ledge didn't trouble us or get us "dirty" but, then,
we were camping and working hard and we weren't on town standards. Actually, though,
when we moved out of our modern tents into the lodge it was a definate step up. The
round walls, the "in the earth" feeling, and the inside fire created a
unique and memorable feeling. The thought of modern comforts did not compete.
TOOLS
The hand tools used were the axe, hatchet, buck saw, folding Sven Saw, and rope tackle
to handle logs; also shovel and pick, and crow bar to take bark off of dead trees.
( On page 183 in Indian Tales it states that, without axes, the Native Californians
used to spend alot of time "worrying" a tree down. Good redwood for the
center post of a large structure could have taken a whole summer to fell.).
LEAVING THE LODGE UNATTENDED
Since the Project group that built the lodge was based in Berkeley, the Dutch Flat
site was often left unattended. We always covered the lodge and removed signs that
might draw attention to it. On one occasion when it was covered and we were about
to leave, as stranger on a motorcycle saw is and drove right up on the lodge roof
to talk to us (and show off). He never suspected there was a living space under him.
On one of the students' return trips to Dutch Flat they found a live rattlesnake
trapped in the lower pit. The snake had to be killed because they couldn't think
of a safe way to free it.
1987 note: I don't know if the lodge is still in use. I assume that it continues
to be visited and maintained by some of the core group and perhaps other Project
members.
2002 note: it's more than 30 years now. The lodges are supposed to last 10 to 20
years. But it is much easier to rebuild one than to start from scratch. Reclaiming
the roof dirt is facilitated by the fact that the dirt is isolated from the wood
tangle by the leaves and bark and can probably be lifted off in sections like sod.
The hole is there and all of the dirt as well, but it's still a big job. We would
probably go down abit deeper with everything. We are trying to find someone who has
seen it recently. 6.13.02.
CLOSING UP THE LODGE
In normal use the smoke hole and vent are never closed. Aside from the fact that
the smoke needs to be vented, the insulation of the dwelling is so superb that there
is no need for a door or hatch in cold or hot weather. However, you may wish to close
it up when you are away to prevent accidents or vandalism or to keep animals from
moving in. Between visits we closed the smoke hole and the vent with strong woven
gratings of branches covered with bark and earth.
Snakes and small animals may get into the lodge in spite of these precautions. Because
of this it is a kindness to lean a branch from the floor to the ledge before closing
up. This allows escape from the lower pit which, otherwise, can become a trap.
The lower pit of the lodge can trap snakes and small animals who may find their way
inside when the lodge is vacated. When you are away, lean a branch from the floor
to the ledge as and escape bridge before closing up the smoke hole and vent.
Though the vacated lodge is an attractive den for snakes and animals, the smoke and
commotion should be more than enough to keep them away if people are there.
AUTHENTICITY
These notes are made primarily for people who would consider making an earth lodge
of their own, not for scholarship, but the practical problems and experiences we
encountered may be of interest to scholars. There may be some light shed on why some
things were done the way they were in authentic lodges (see footnote 4 in back).
I was inspired to get into this project from "Indian Tales" by Jaime de
Angulo and by his drawings in the introduction. Also, the description of a family
lodge in "Ishi in Two Worlds" (p. 32). When I sought detailed information
on earth lodges at the Phoebe Hearst Museum of Anthropology on the UC Berkeley campus
(across from the art museum), I was surprised to find very little. You can see most
of what I found attatched to this informal writing. If you are reading this on a
web page, see the bibliography, because we can't publish the copywrited material.
What I ended up with for a design was a composite of ideas that would work for our
group. The result, with the ledges and the vent to the east worked beautifully. As
the literature says, the smoke hole was the preferred entrance in our practice. The
fire needed was tiny. It was a very happy space to be in.
Ishi describes a lodge much like ours in dimension and detail, including the ledge
around a circular lower pit. But it mentions "center posts" and says it
is banked with 3 or 4 feet of earth- probably a reference to a round outer wall.
He is talking about a one family lodge for living as opposed to a ceremonial lodge.
"Indian Tales" describes a family lodge with a center post and roof like
ours but without the double pit.
SWEAT LODGE
Whenever a discussion of the earth lodge comes up someone in the group thinks you
are talking about a sweat lodge. I recently showed the lodge model to a Native American
I met at a tradional "sweat"- a ceremony in a sweat lodge, after the manner
of the Plains Indians. He said small ones like it were used as sweat lodges but what
is generally in use- and what we used- is a temporary structure placed above ground.
According to Dave Evans of Santa Cruz, California, it is made from willow branches
bent over, "two and two", to create an octagon pattern overhead. This frame
is covered with hides or canvas:
Plains Indian Sweat Lodge- willow branches covered with hides,
about 10 feet in diameter; holds about a dozen people.
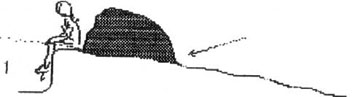
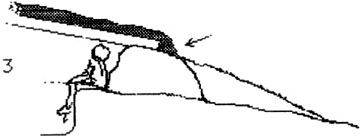
THE MISTAKE AT THE DUTCH FLAT SITE
There is a hand written note from 1971 that states: "Don't use earth from hole
to build up side backrest level; must dig deeper or run out of dirt for roof."
But, there is more to it than that... we learned the hard way that the way to
an efficient work process* is to get all the dirt you need from the hole
you're digging for the pit. Otherwise you'll end up taking it from a distance, since
there is usually no desire to dig up the nearby living area.
* Efficiency is fine, but there is no reason to avoid hard work in
a project like this. It is that which brought the group together as much as anything.
As you may be able to see in the photos and the film, we dug this deep:
We relied on the dirt from the hole to create a ring of earth above ground for a
backrest and a cover of 4 or 5 inches on the roof. I thought this would save us work
and time. It backfired and cost more work in the long run because it turned out that,
though the shallower hole provided enough earth for the ring, there was not enough
to finish the roof.
And, since we wanted the roof line to blend smoothly into the land, there was a need
that I had not foreseen for even more earth fill than that.
The ring piled up to make the backrest met the groundline abruptly.
In order to meet the goal of having the roofline blend in like the surrounding hillocks,
a mass of earth at least equal to the ring had to be found at a distance from the
site.
But that wasn't all. When we covered the roof with dirt we found there was another
jag in the line of 4 or 5 inches plus the amount that the beams and sticks rose above
the dirt ring.
Even this last bit of filler amounted to something worth talking about. [make type
bigger? (not like the book.)]
|
|
|
|
|
|
|
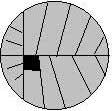
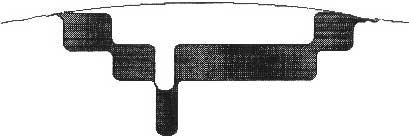
| Area needed to cover roof only. |
|
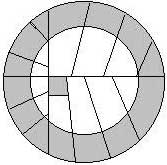
Area needed to feather out the roofline. |
A glance at the top view shows the extent of the extra work. True, it meant alot
more work to dig a deeper hole (and we were glad when the shallow one was finished)
but as shown in the film, we ended up carrying dirt in 5 gallon pots to cover the
extra area.
Though we did finish before our vacation time was up it would have been a more relaxed
ending and we would have had some time to live in the lodge for a day or two at the
end. This would have been much better for the purpose of the project, which was to
further the sense of community of the group.
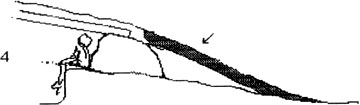
In summary, we dug this deep.
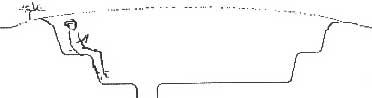
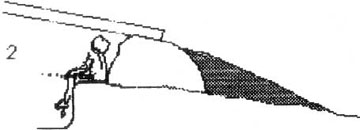
We should have dug this deep.
If we had, we'd have had all this extra dirt to work with (and
right at the site, not hundreds of feet away).
In the Indian Tales drawing there is no effort to smoothe out the line between the
ground level and the roof. Judging from the people in the drawing, the pit is probably
5 1/2 to 6 feet deep and it is a larger structure. It's hard to tell if they had
enough earth from the pit to make the mound and cover the roof as well. I probably
put our mound at ground level because they did, but I didn't realize that our desire
to blend the form with the land and our need to hide the dwelling between visits
meant we had to work differently.
LEVEL OF OUTER BEAM ENDS
I was going to advise a new strategy of putting the ends of the poles slightly underground
like this:
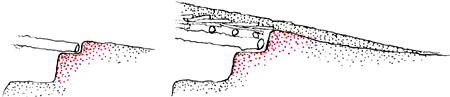
It would mean the whole pit would be six to twelve inches deeper to accomodate the
thickness of the roof so that the surface of the roof dirt would finish off at ground
level. This would bring the solution of the mistake to a logical conclusion but it
could also put the runoff into the pit. It is not worth the risk of that for the
amount of feathering required when the beams rest at ground level as usual:
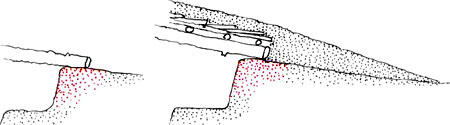
And if some far-and-wide seeking for earth becomes necessary to feather out the roof
line, it may bring some comfort to remember that digging the whole double pit 6 to
12 inches deeper would have been alot of work... or think positive and dig a root
cellar and use the dirt from that.
Copyright 2002, Don Cochrane
|
|